Enable RTSP on your Cisco Meraki cameras to enjoy low-latency, multi-camera streaming to an iPhone, iPad, Apple TV or Apple Silicon Mac.
NOTE: Typing on an Apple TV isn’t a great experience, so consider using an additional device (iPhone, iPad or Mac) to configure all of the cameras in Streamie. You can join multiple devices to the same account and avoid having to do any of the configuration directly on the Apple TV.
Before you can use your Cisco Meraki cameras with Streamie, you must enable RTSP on each camera that you want to access. You can find Cisco’s documentation on that here. In short:
- Select Cameras - Monitor - Cameras and select a camera from the list.
- Select Settings - Video Settings.
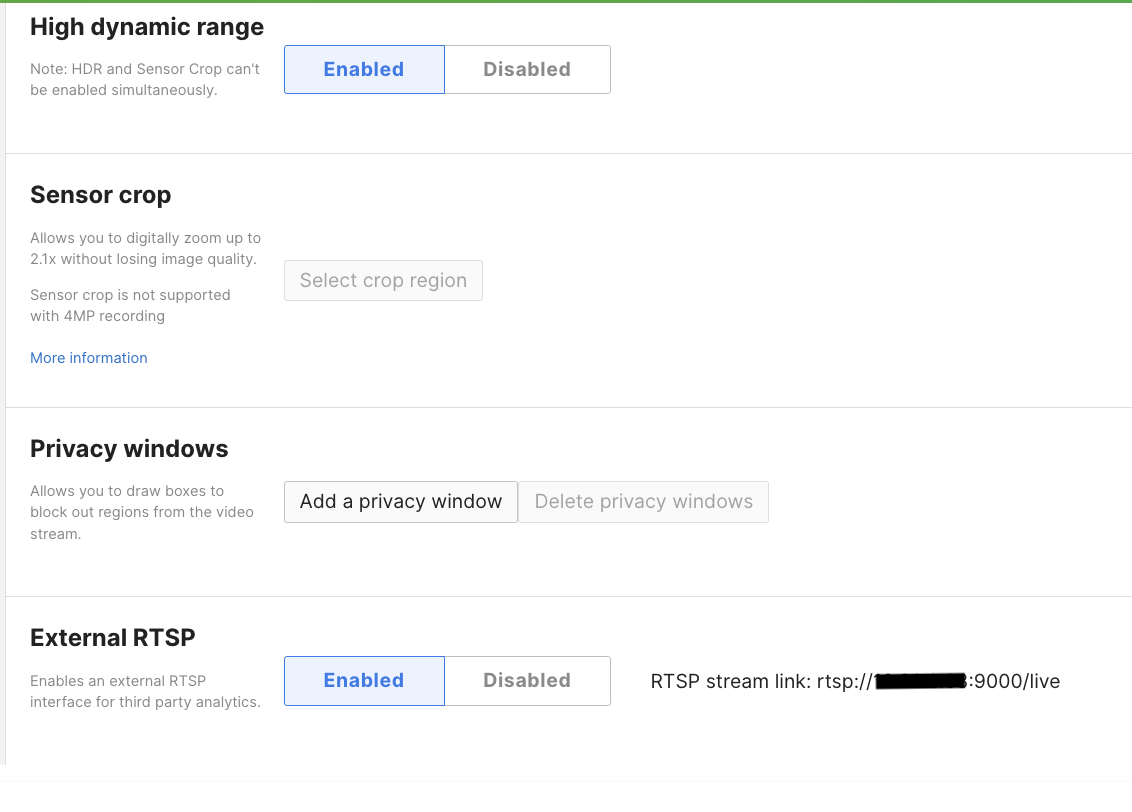
- Under External RTSP select “Yes” and use the provided stream link to access the camera.
You should see a URL that looks something like:
- rtsp://x.x.x.x:9000/live
Make note of that URL. We’ll need to use it in a moment.

In Streamie, navigate to the Home tab - Cameras - Options - Add Camera. RTSP cameras are not automatically discovered, so continue to navigate to Options - Add Manually and choose the RTSP option.
Enter the components from the URL above, substituting the actual IP address:
- Scheme: rtsp
- Hostname: x.x.x.x
- Port Number: 9000
- Path: /live
You can leave all of the other options alone. If you hit “Reload” on the Stream section, you should be able to see some specs on the RTSP stream.
Finally, hit Save & Close. Return to the Cameras screen. Tap on your camera and you should be up-and-running.
Repeat these steps for each of your Meraki cameras.
Streamie provides Groups for arranging multiple cameras on a screen in a persistent and convenient way. After all of your cameras are configured, navigate to Home - Groups - Options - Add Group. You can add some or all of your cameras to this group (subject to the GPU limits of the device you’re using), arrange them, rotate them, resize them and so on. Save & Close. You can then tap on this new group to start streaming all of those cameras.
Once the group is streaming, you can also make changes to the arrangement and layout of the cameras. Those changes will be saved to the group.
You can learn more about configuring groups here.
Created: 1 year ago
Updated: 1 year ago
Author: Curtis Jones
Streamie provides a best-in-class user experience on your iPhone, iPad, Apple TV and Apple Silicon Mac, with an intuitive user interface that makes it simple to discover, stream, record, monitor and share your HomeKit, Google Nest, Ubiquiti UniFi Protect and ONVIF-compatible IP and RTSP cameras. Streamie keeps you informed with motion event notifications and it works with most cameras using its advanced audio and video codec support. You can watch your cameras from anywhere, record 24/7 to your private NAS, remotely manage multiple locations, device permissions and seamlessly synchronize settings across your devices; configure Hubitat smart home automations, live stream to YouTube and rely on the in-app technical support system when you need help -- and you can also reach us by phone. Download Streamie today for all of your CCTV needs.