Eufy 2K PTZ
The Eufy 2k PTZ IP camera supports HomeKit and RTSP for NAS recording. Fortunately, we can also use its RTSP support for Streamie integration. Because this Eufy camera does not support ONVIF, we cannot use its PTZ features within Streamie.
In this article we'll unbox the camera, get it set up with the Eufy Security app, enable its RTSP support and then configure Streamie so we can stop using the Eufy Security app (and also then disable the camera's internet access).
The screenshots of the Streamie setup process are taken from an iPhone, but you can also stream your Eufy camera to the Apple TV with Streamie following these same instructions.
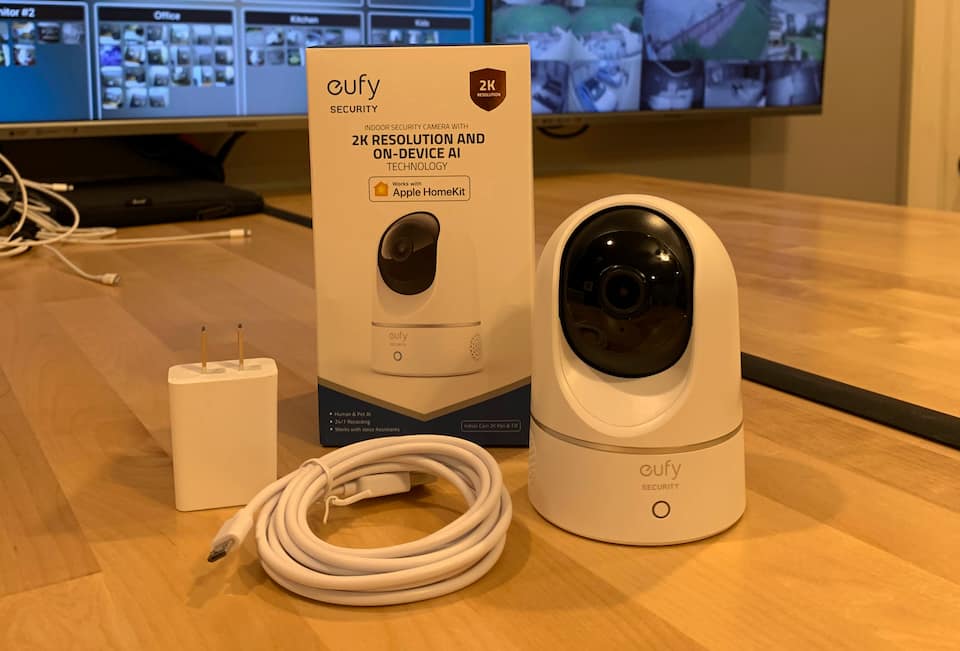
There's not a lot to say here. The camera is accompanied by a USB power cable, wall adapter and a camera mount. It's nice of them to include the camera mount; I don't see that very often.

If you haven't already done so, you need to install the Eufy Security app. Annoyingly, you'll have to create an account before you can set up your camera. Everyone expects that these days, but it's a dumb requirement and something that Streamie absolutely avoids.
Once you're logged into the app, you'll add a new device and find your device in the long list of Eufy devices.
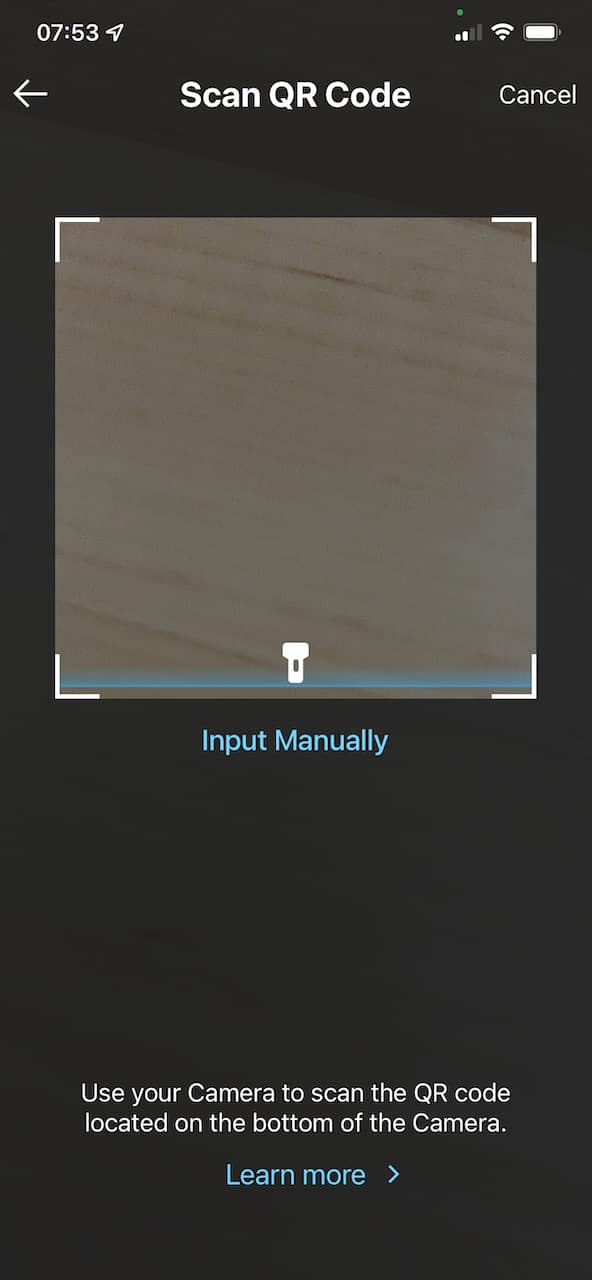
As a next step, you scan the QR code on the bottom of the camera. This is peculiar, because the QR code could easily contain the product details so that it would not be necessary to correctly select the camera from the device list, but, whatever.
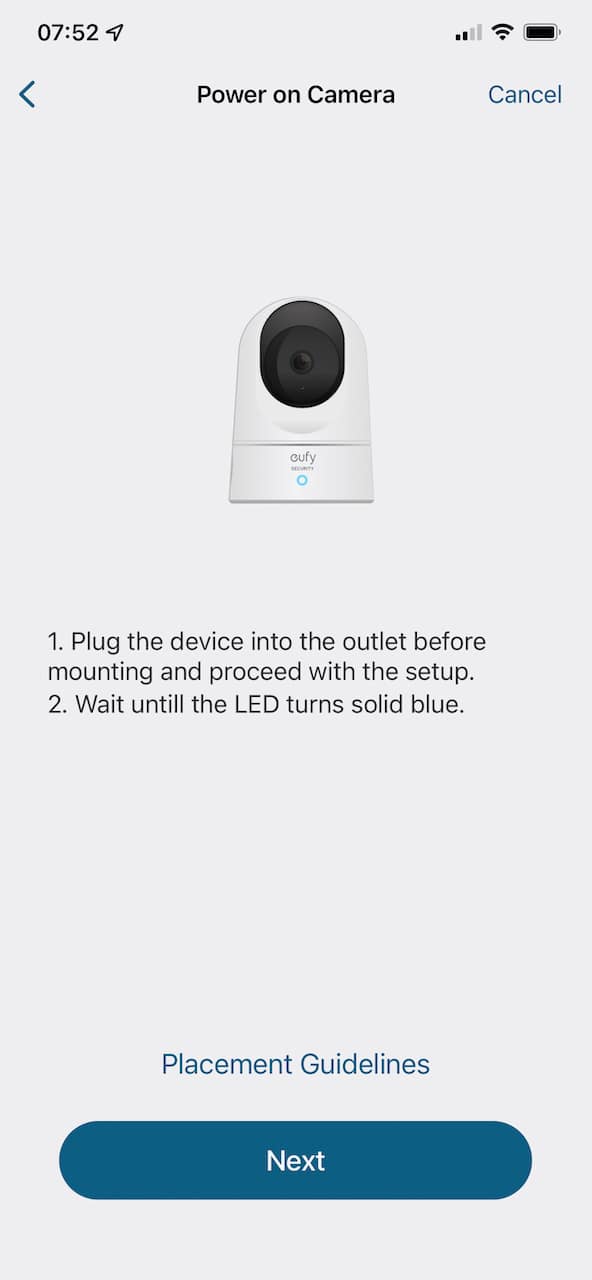
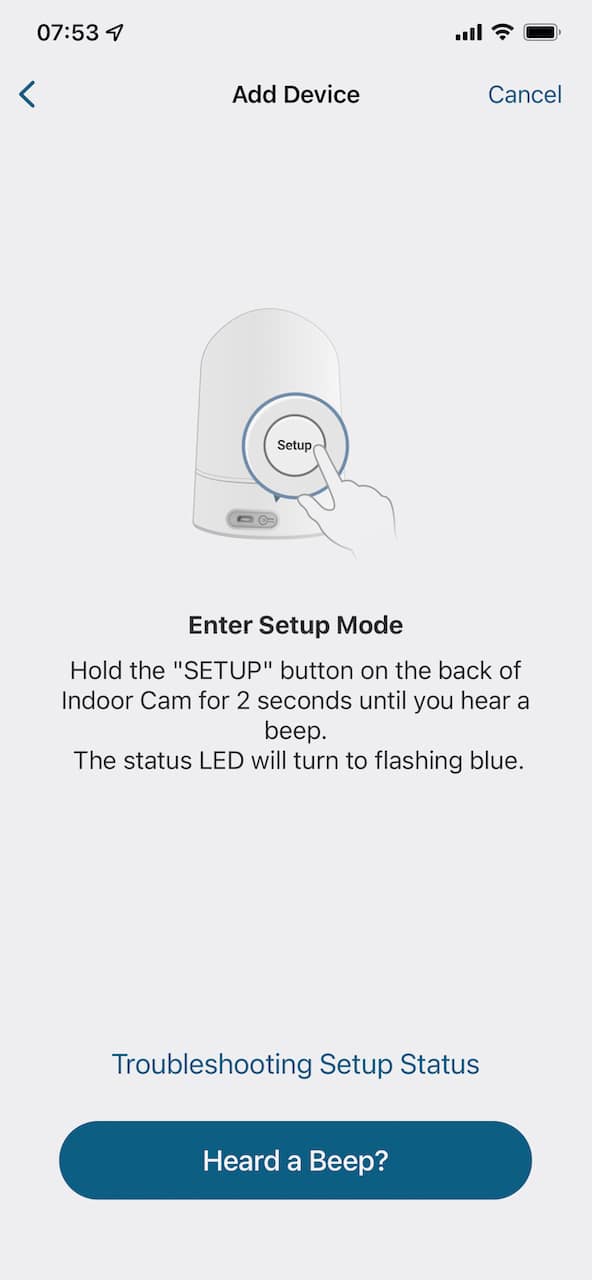
Finally, you press the setup button on the back of the camera. You'll provide your wifi password and then the camera will "phone home," which is never a feature I look for in a camera.
Overall, it was a painless setup process, but the user account requirement and the internet access requirement continue to be annoyances.
Next up, we want to enable RTSP so that we can stream the camera without the Eufy Security app. This'll also let us use the camera with Streamie, including sharing the camera, recording it to a NAS and viewing it on an Apple TV. It's funny that there's basically just a few steps to set up the camera as a whole, but nearly a dozen steps to enable RTSP.
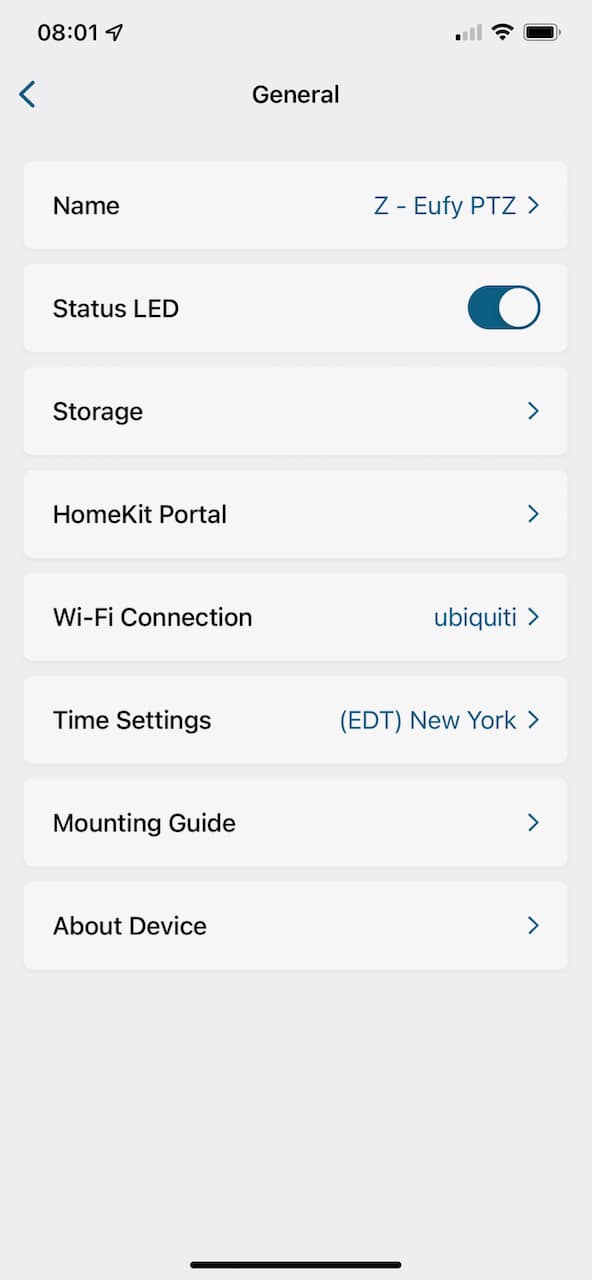
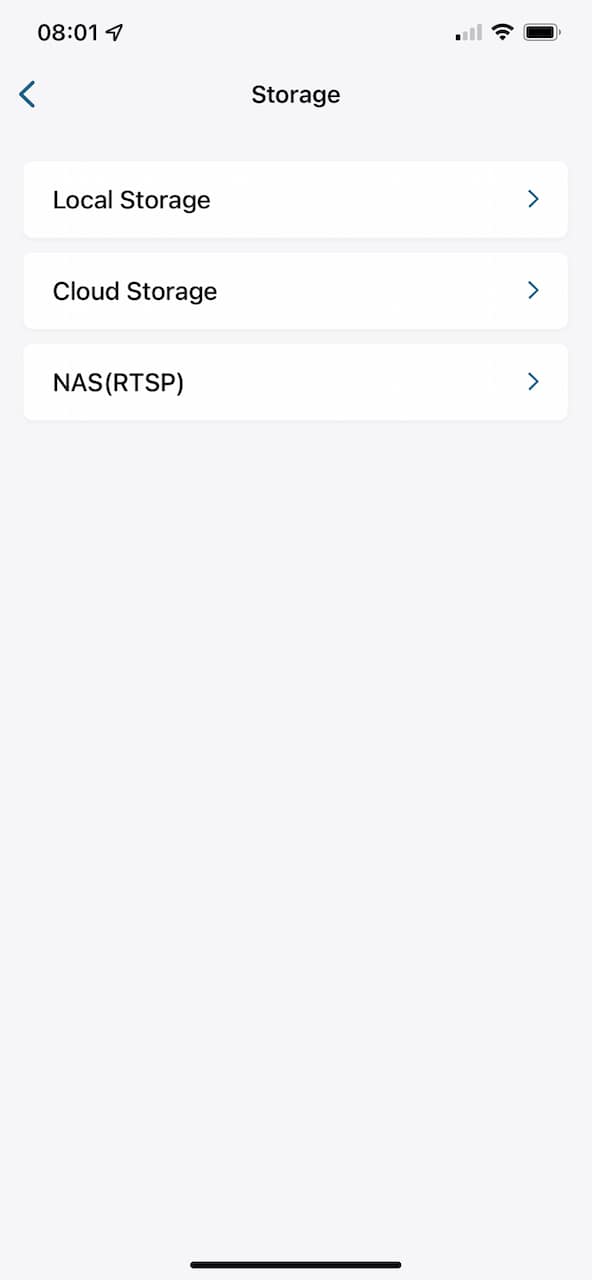
In the Eufy Security app, there's a gear icon for editing the settings for your newly added camera. Tap on that gear icon and choose "General" and then "Storage".
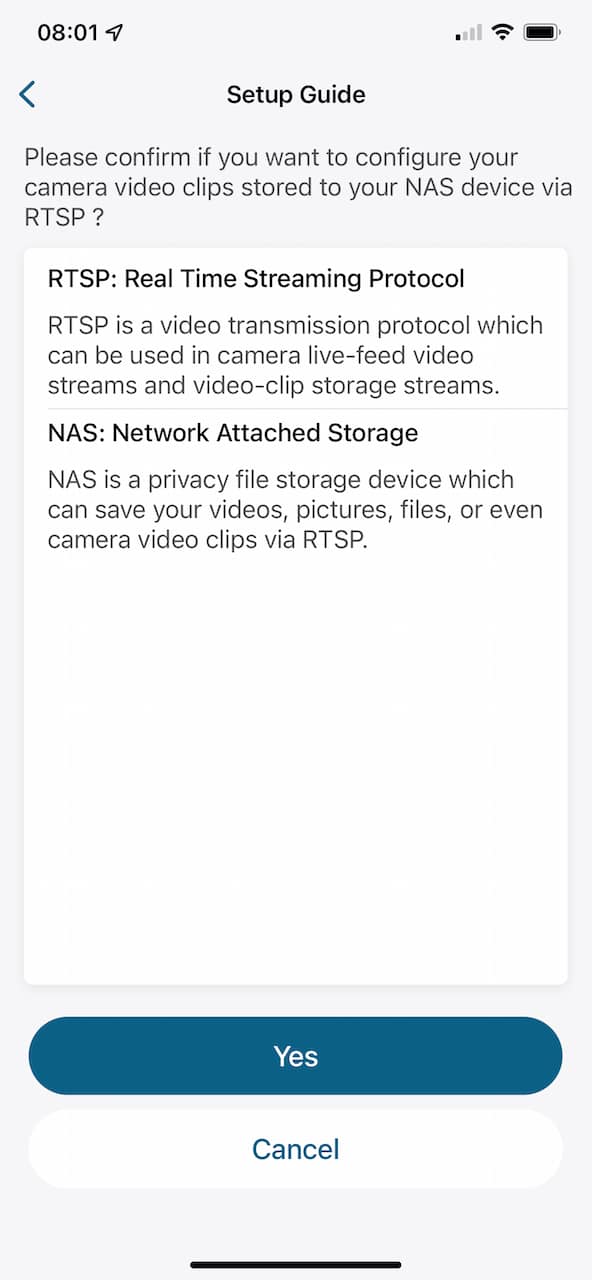
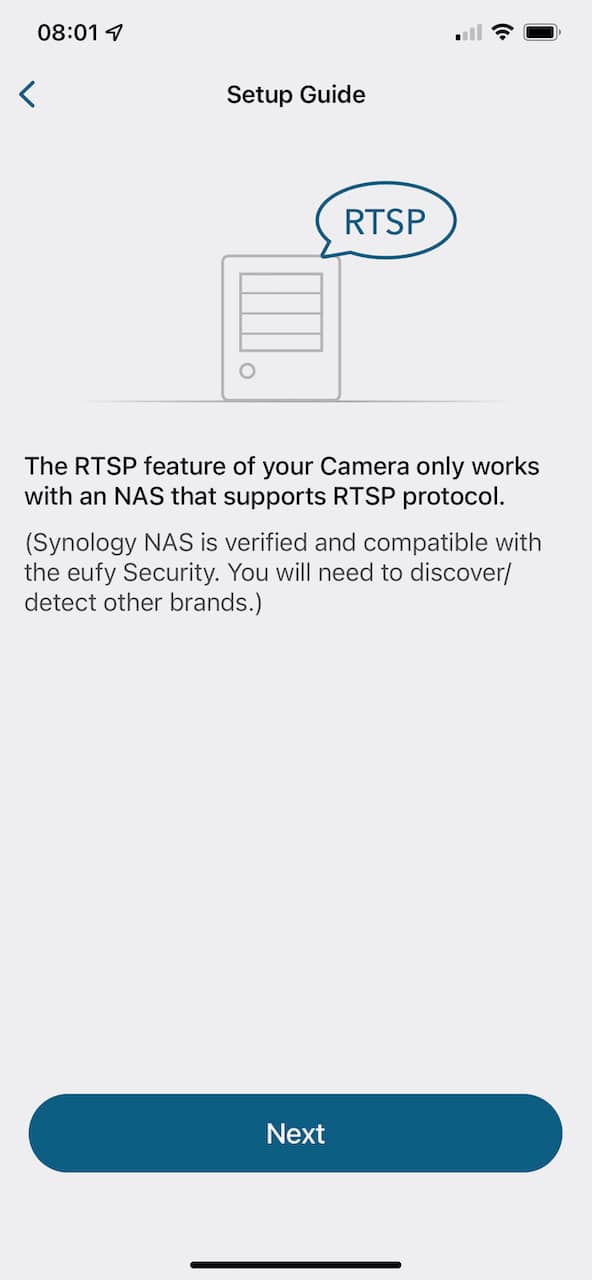
Then choose "NAS (RTSP)".
Confirm "Yes".
Confirm "Next".
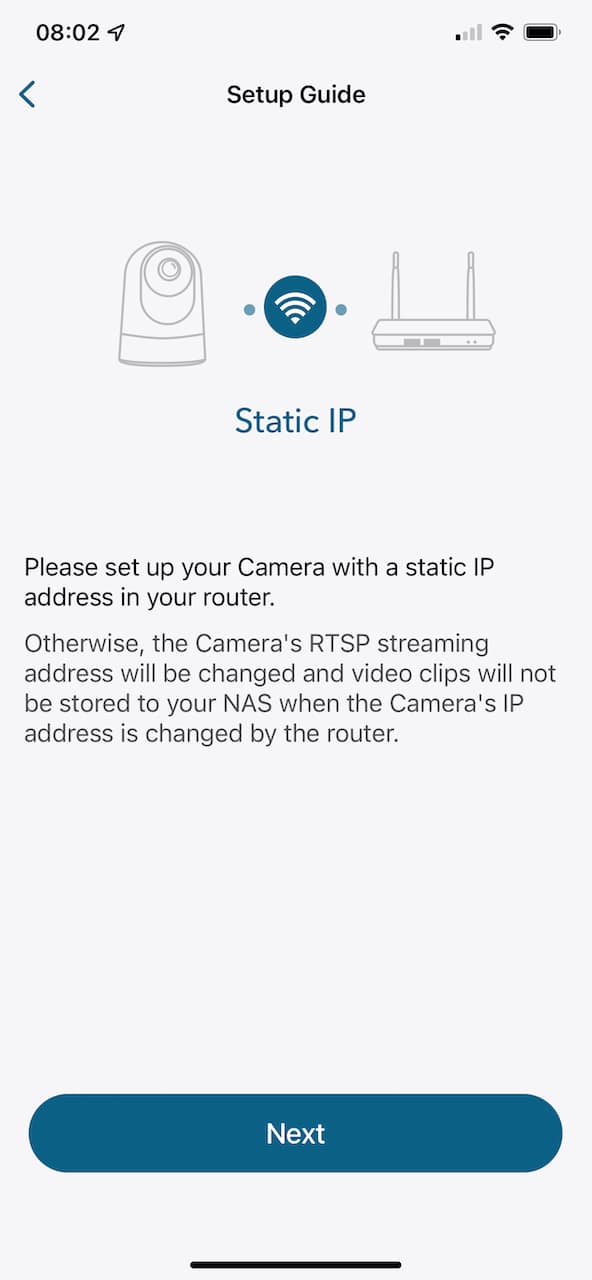
Confirm "Next". This tells you that if your camera's IP address changes, then your RTSP settings will become invalid. The camera apparently only supports DHCP, which means that the camera always uses the IP address that your router gives to it. To ensure the camera always gets the same IP address, you'll have to access your router and configure it accordingly. This is outside the scope of this document, but be aware that if your power goes out, your camera will likely get a new IP address, which isn't desirable.
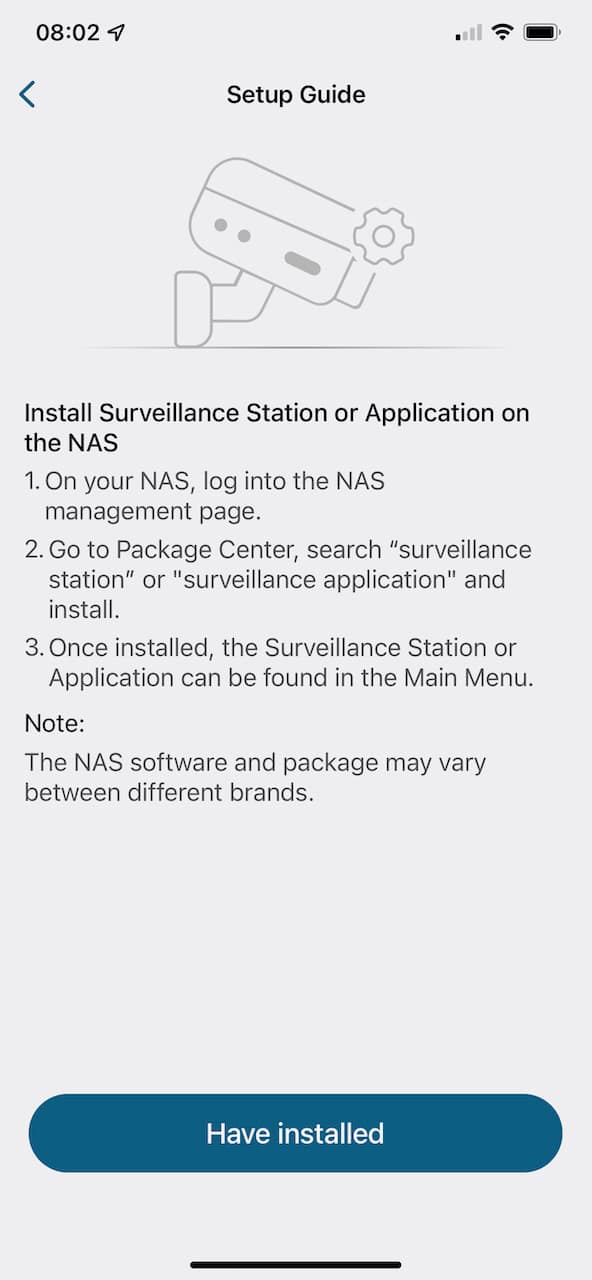
Confirm "Have installed" -- but you don't actually need to do anything.
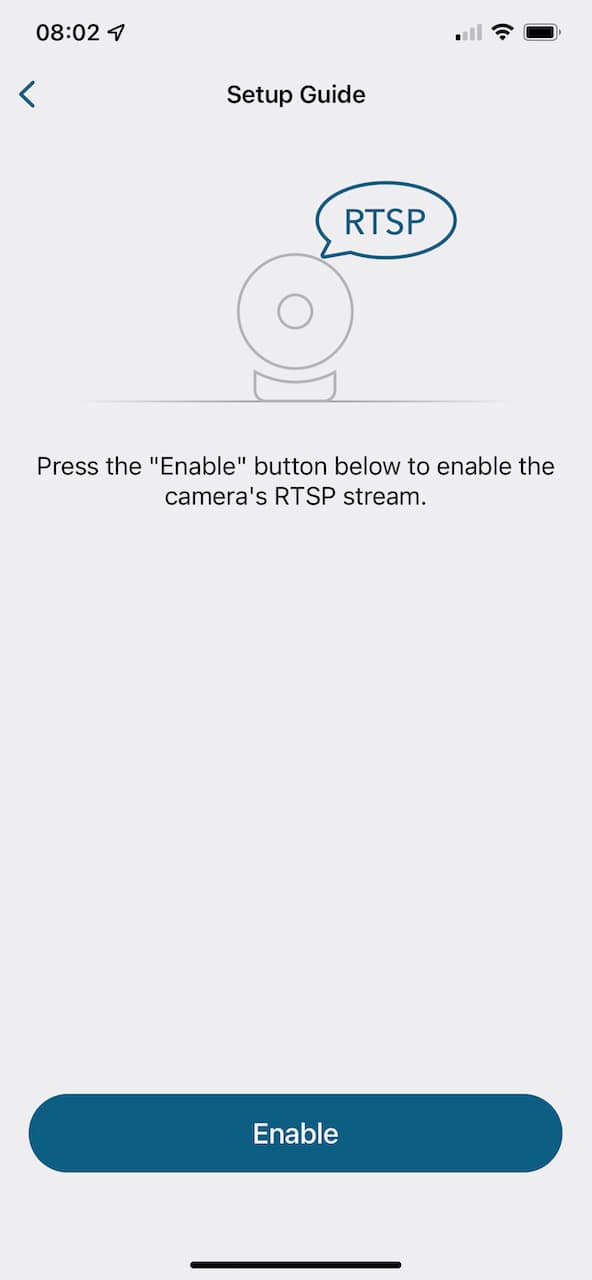
Confirm "Enable" -- good grief these instructions are pedantic.
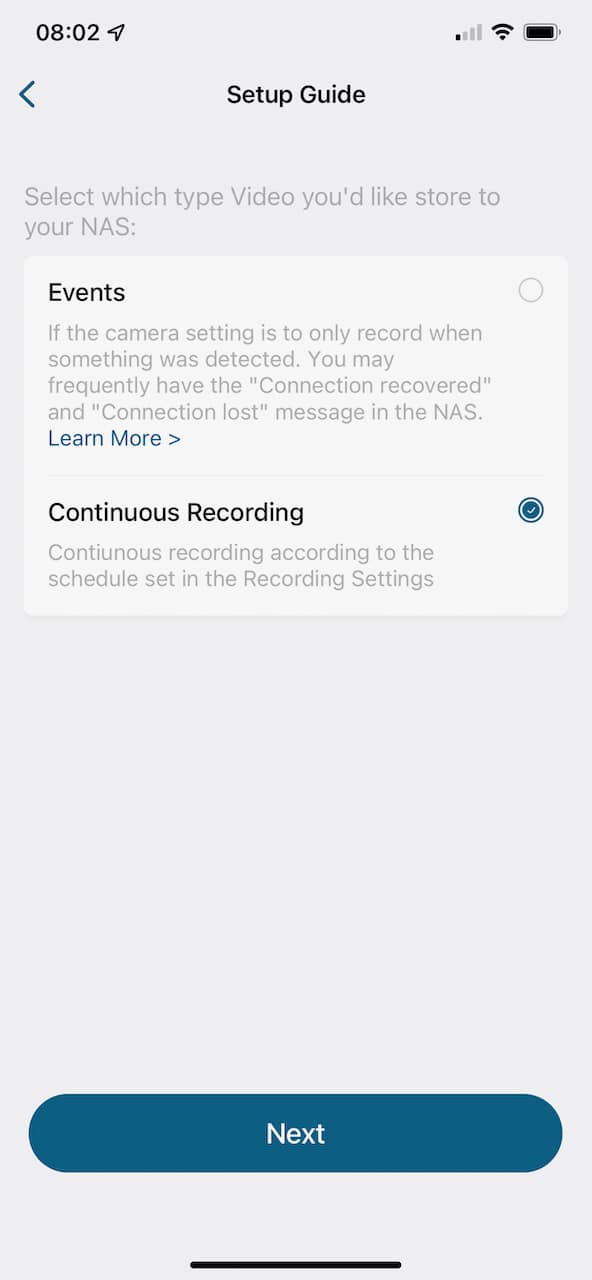
Choose "Continuous recording" and then confirm "Next".
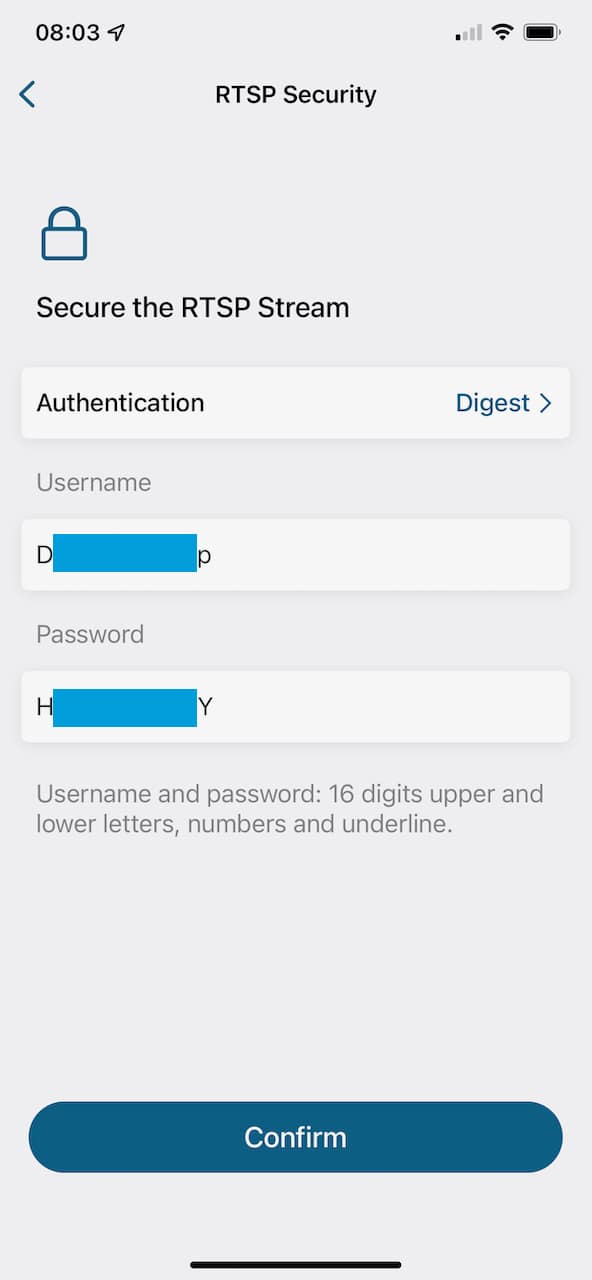
Save your username and password some place safe for a bit.
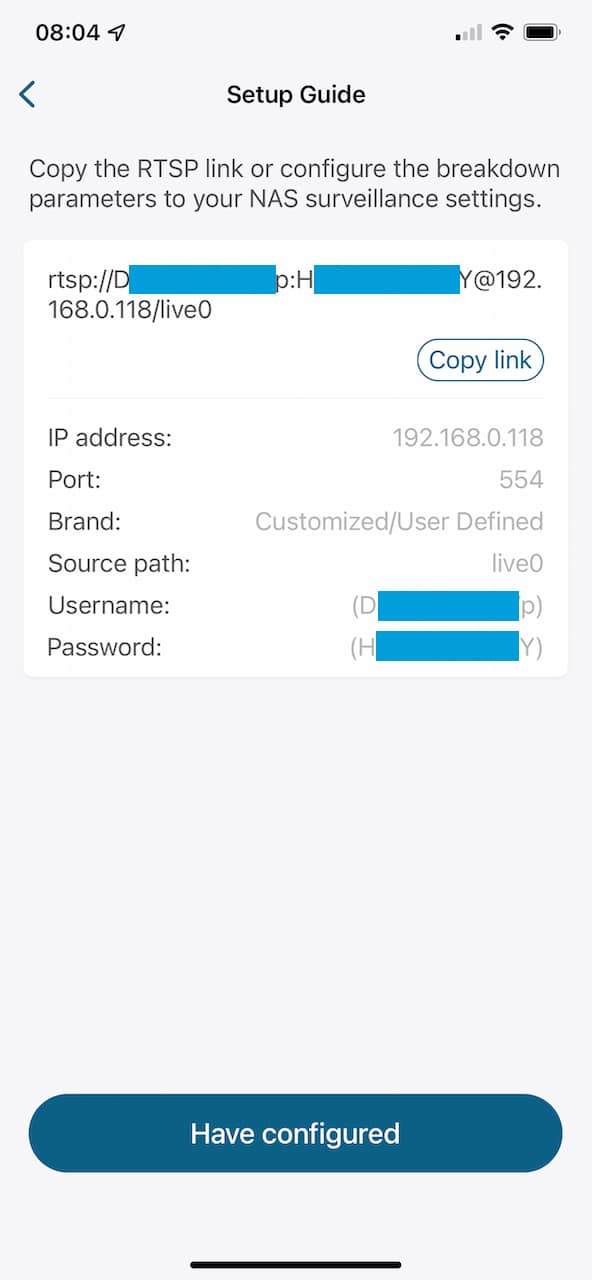
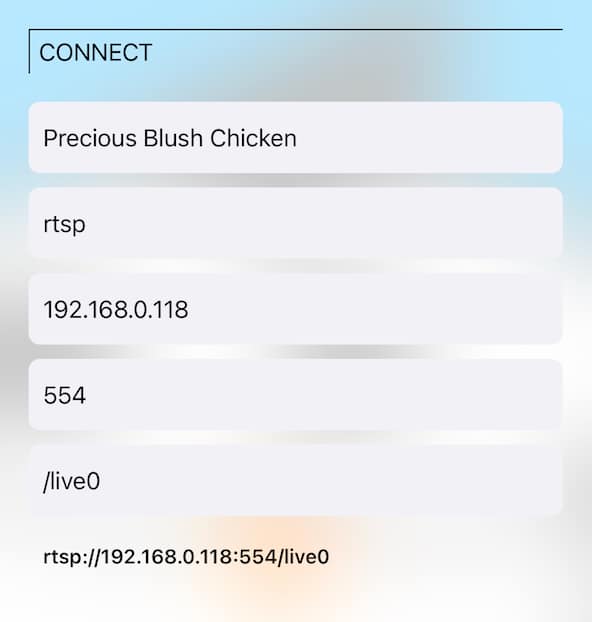
The URL at the top is what we care about. It shows that the RTSP path the camera expects is "/live0". We'll need this for setting up Streamie in the next section. Also note the IP address.
Streamie is the app for iPhone, iPad, Apple TV and Apple Silicon Mac that works with many cameras all in one beautiful interface (if I do say so myself). We've already set up the Eufy camera and enabled its RTSP support. Now we just need to add the camera to Streamie. These screenshots are from an iPhone, but the same functionality exists for iPad, Apple TV and Mac.
Install Streamie if you haven’t already done so. It’s free!
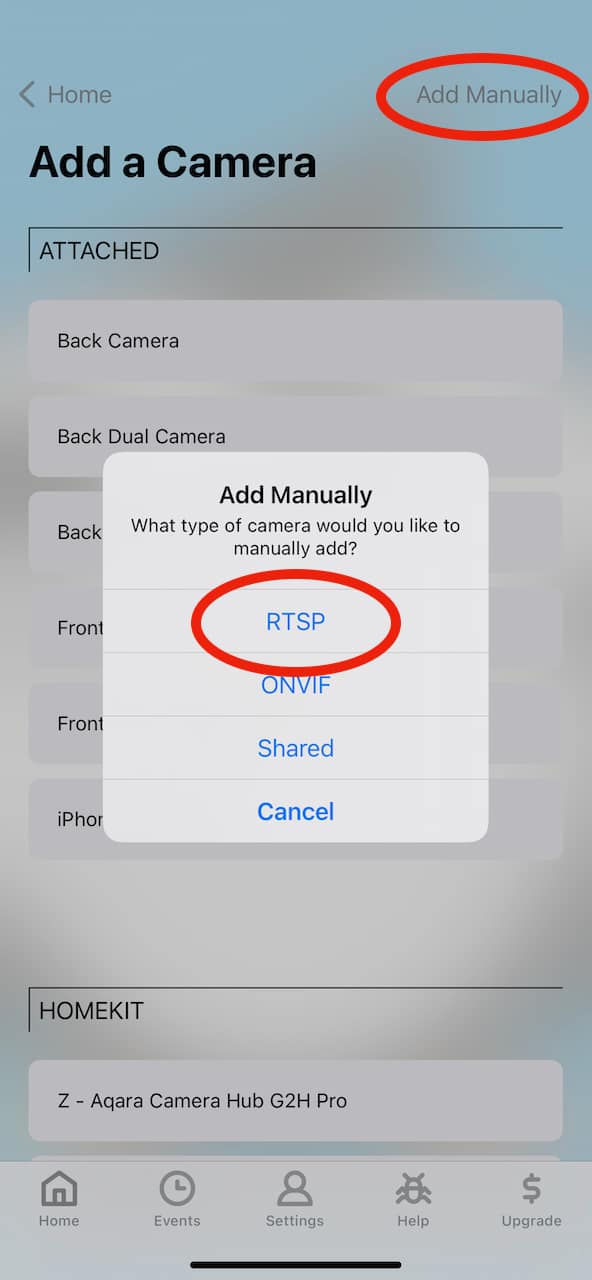
On the Home tab, scroll to the Cameras section and tap on the hamburger menu. Choose "Add camera" and then choose "Add manually". For cameras that support ONVIF, we can automatically discover the camera, but this Eufy camera does not support ONVIF. Confirm that you want to add an "RTSP" camera.
Type in the IP address of the camera and the "/live0" path.
Scroll down and type in the username and password. Scroll down and tap "Continue". Streamie should connect to the camera and load a preview image. If you instead see an error, confirm that the IP address, path, username and password are all correct and that your phone is on the same wifi network with the camera.

If everything worked, tap "Save & Close".
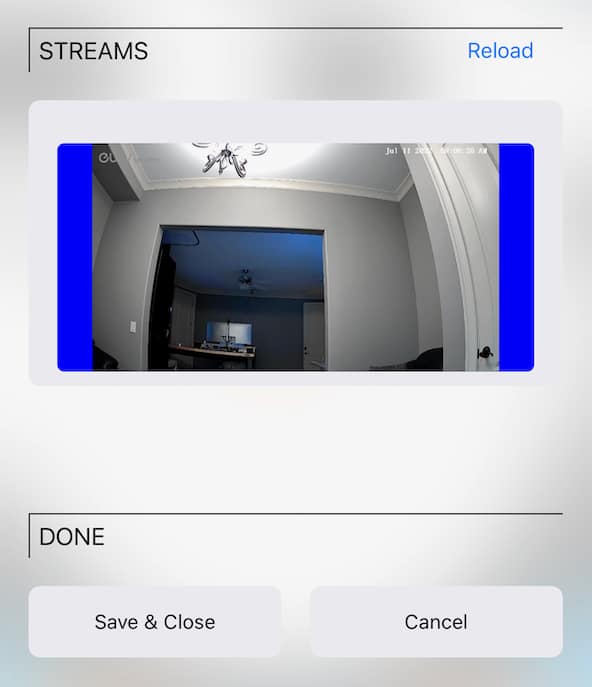
Your new camera will appear in your list of cameras. Tap on it and it should start streaming right away.

The final step you should consider with any camera is to remove its internet access. Cameras, in general, should not be trusted. Consult your ISP or local neighborhood tech support guru for how to configure your router to block your camera's internet access. With Streamie, you can still access your camera remotely, even when the camera's internet access is disabled.
If you run into any issues setting up your Eufy camera and adding it to Streamie, contact us for assistance. We're happy to help.
Created: 4 years ago
Updated: 4 years ago
Author: Curtis Jones
Topics: Tutorial
Streamie provides a best-in-class user experience on your iPhone, iPad, Apple TV and Apple Silicon Mac, with an intuitive user interface that makes it simple to discover, stream, record, monitor and share your HomeKit, Google Nest, Ubiquiti UniFi Protect and ONVIF-compatible IP and RTSP cameras. Streamie keeps you informed with motion event notifications and it works with most cameras using its advanced audio and video codec support. You can watch your cameras from anywhere, record 24/7 to your private NAS, remotely manage multiple locations, device permissions and seamlessly synchronize settings across your devices; configure Hubitat smart home automations, live stream to YouTube and rely on the in-app technical support system when you need help -- and you can also reach us by phone. Download Streamie today for all of your CCTV needs.